Friday, April 30

Rear spring spacers & subframe mounts

For the 2009 grm challenge, we needed to raise the rear of the car by about .5 inches, so what better way to do it cheaply than by using plywood.


After about 6 months of autox and flat towing in the rain, the plywood spacers were beginning to rot. I had some leftover material from the motor mounts we made earlier this year, and I designed some custom spacers made specifically for our springs. My dad was nice enough to fab them up last week.


A quick test fit shows that they fit perfectly!


I can't wait to test them out at our next autox on the 9th, as long as jimmy and I get the car back together in time.


Another much needed upgrade we've been working on was some Rear sub frame mounts. I took a bunch of Pictures and Measurements from a buddies set of polyurethane mounts before John Installed them on his car.


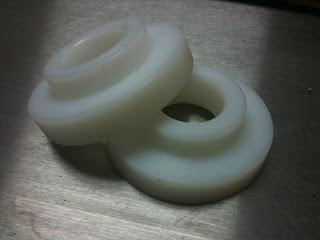
With some scrap brass tube my dad had lying around his work, and a small piece of UHMW I bought online, we were able to come up with these.


I think they will work perfectly!

For those interested:
Ultra high molecular weight polyethylene (UHMWPE or sometimes shortened to UHMW), also known as high-modulus polyethylene (HMPE) or high-performance polyethylene (HPPE), is a subset of the thermoplastic polyethylene. It has extremely long chains, with molecular weight numbering in the millions, usually between 2 and 6 million. The longer chain serves to transfer load more effectively to the polymer backbone by strengthening intermolecular interactions. This results in a very tough material, with the highest impact strength of any thermoplastic presently made.[citation needed] It is highly resistant to corrosive chemicals, with exception of oxidizing acids. It has extremely low moisture absorption, has a very low coefficient of friction, is self-lubricating, and is highly resistant to abrasion (15 times more resistant to abrasion than carbon steel). Its coefficient of friction is significantly lower than that of nylon and acetal, and is comparable to that of Teflon, but UHMWPE has better abrasion resistance than Teflon. It is odorless, tasteless, and nontoxic.

Saturday, April 24

Videos from the easter autox.


Easter 4-4-2010 PCA Autox at bank atlantic.

This was run 3 of 4 in heat #1. This was the first run back on the stock Motronic and 535 AFM after trying a completely new setup with a Volvo MAF.


This was run 4 of 4 in heat #1. THe car was a little loose, but was still the fastest run up to this point. This was the second run on the stock Motronic and 535 AFM.


Sunday, April 18

Final fitment

Today went a lot slower than expected. After yesterday's quick
cutting and mock-ups, I expected to get to the shop today and tack
everthing in place... I was wrong. The first 2 pics are yesterday's
final fitment. What I realized today, is that with the suspension
fully compressed the tires would rub on the fenders. I pulled
everything apart, and removed the rubber undercoating, and rolled the
insides with a hammer. After a lot of trys, using rivets and tack
welds, I was able to get a fitment that followed the body lines, and
doesn't rub at full compression. The next time we work on the car,
I'll weld everything in permanently.

Friday I was at the junkyard, and was able to score this nice BMW e36
rear bumper. With the flares, it fits perfect, as if it was meant for
the car. We've been wanting to add this bumper for a while now, but
because of the style of our old box flares it wasn't possible... Until
now.
Oh by the way, I've been looking at another grm team getting ready to
compete in the challenge for the first time. They are also building a
bmw e30, and it's slowly becoming surprisingly similar to ours... I
don't know if I should be flattered or be angry that they are taking
many of our ideas... Whatever, Bring it on Vorschlag! We are looking
forward to meeting and beating you guys at the challenge!

Saturday, April 17

Is it coming together or coming apart?

I'm working on the rear quarter panel widebody. It's coming together a
bit differently than I imagined, but I'm happy with the look so far.

Tuesday, April 13

Rear fiberglass fenders are off.

This is a quick update from some work we did last week. We drilled all
the rivets off, and popped both fiberglass fenders off the car. We are
ready to start cutting as soon as I get a new sawzall blade.

Sunday, April 4

Autox time

So John came over Saturday to tune/ burn chips for the new Volvo MAF conversion for the turbo m20. He has already come by once, on Friday to tune, but we wasted a lot of time chasing some connectivity issues between the Chip burner and the Laptop. I was planning to test it out at the April 4 autox. He must have burned the chip and installed it in the car a total of over 50 times in the past 2 days!... talk about being persistent, this guy never quits.


While John was burning/testing the chip, I ran to a friend's shop to mount and balance some old tires on the 15 x 10 race wheels. We are currently running 275/35-15 Hoosier A-6's, and we finally reached the belts on the front two at our last event at Homestead. I have a set of R-6's(leftover from the 2008 challenge) but they are only 225/45-15. Paul, tried to mount them on the 10" wide wheels, but they were too old, and wouldn't stretch the full width of the wheel, so he ended up mounting them on my old Sportmax 15x8.

I ended up competing on the15x8 with 225/45-15 in the front and the 275/35-15 mounted on the 15x10s in the rear. I really thought I was going to have a lot of problems with under-steer, but the car felt very neutral. throughout the event. I did have some issues with the MAF conversion and ended up switching back to my  535 AFM/ Ebay chip combo. I forgot my camera, but managed a couple pics with my iphone


I borrowed a friend's digi camera and mounted it ont the windsheild, so I should have some vids of my runs by mid week, but for the time being, you'll just have to settle for some fun videos Jimmy and I took after the last event. Enjoy ;)


Widebody Take 2 part 3

 In this update I finish up most of the metal work on the front fenders. I wanted to make sure both fenders were exactly the same, so before welding the driver's side fender seen below, I traced the top panel on some scrap poster board.


 I took the tracing, cut it out, and used it as a template for the passenger's side fender.


Once it was mocked up, I welded the panels in place.


...and temporarily shot the welds with some left over olive drab spray paint. They turned out pretty good. i still need to cut the rusty sections out of the bottoms, but that's for a different day.